Adding missions or scenarios to any kind of competitive game helps solidify gameplay and encourage movement and disruption. It’s great for the health of a game– if you’ve ever played a game that’s simply deathmatching, it gets a bit boring unless it’s got a really, REALLY excellent combat system and levels to play in. Most minis games devolve into all-out brawls without missions, and become kind of samey. Missions help break that up, so for this Bushido board project, we’re going to look at how we’re actually going to use the board.

Bushido has three types of scenario layouts, each with two scenarios that are played on them. This makes it fairly easy to look at the positioning of objectives and get an idea of how you’ll interact with them, as well as what kind of boards they’re looking at.
Mission Type 1: Opposite Corners
The layout of this kind of objective is really simple: deployment is on opposite corners of the table and there are no special objects placed on the board. It looks like this:

The pictured mission is called “The Envoy”, and it’s conceptually fairly straightforward. Your opponent nominates one of your units as a Very Important Model (VIM), and you nominate one of theirs. You score if your VIM has received fewer wounds than your opponent’s, you score if you draw first blood on your opponent’s VIM, and you score if your VIM is closer to the opponent’s deployment zone than your opponent’s VIM is to yours.
This is a neat scenario that promotes motion across the table. A really great board for this mission will put you directly in the path of your opponent while also providing alternate paths to try to sneak your VIM around.
The other scenario using this layout is called “The Messenger”. In The Messenger, you secretly choose one of your own units to be the Messenger. You score if your Messenger is the only one still alive at the end of the game, you score if you kill your opponent’s VIM on a turn yours is still alive, and you score if you get your VIM to the opponent’s deployment zone and reveal it before your opponent has done the same.
It’s a similar concept with a bit more opportunity for mind games. You’re still encouraged to move through the space, and the same kind of design tenets that make for a good Envoy board also make for a good Messenger board.
Both of these make me favor the square-walled board:
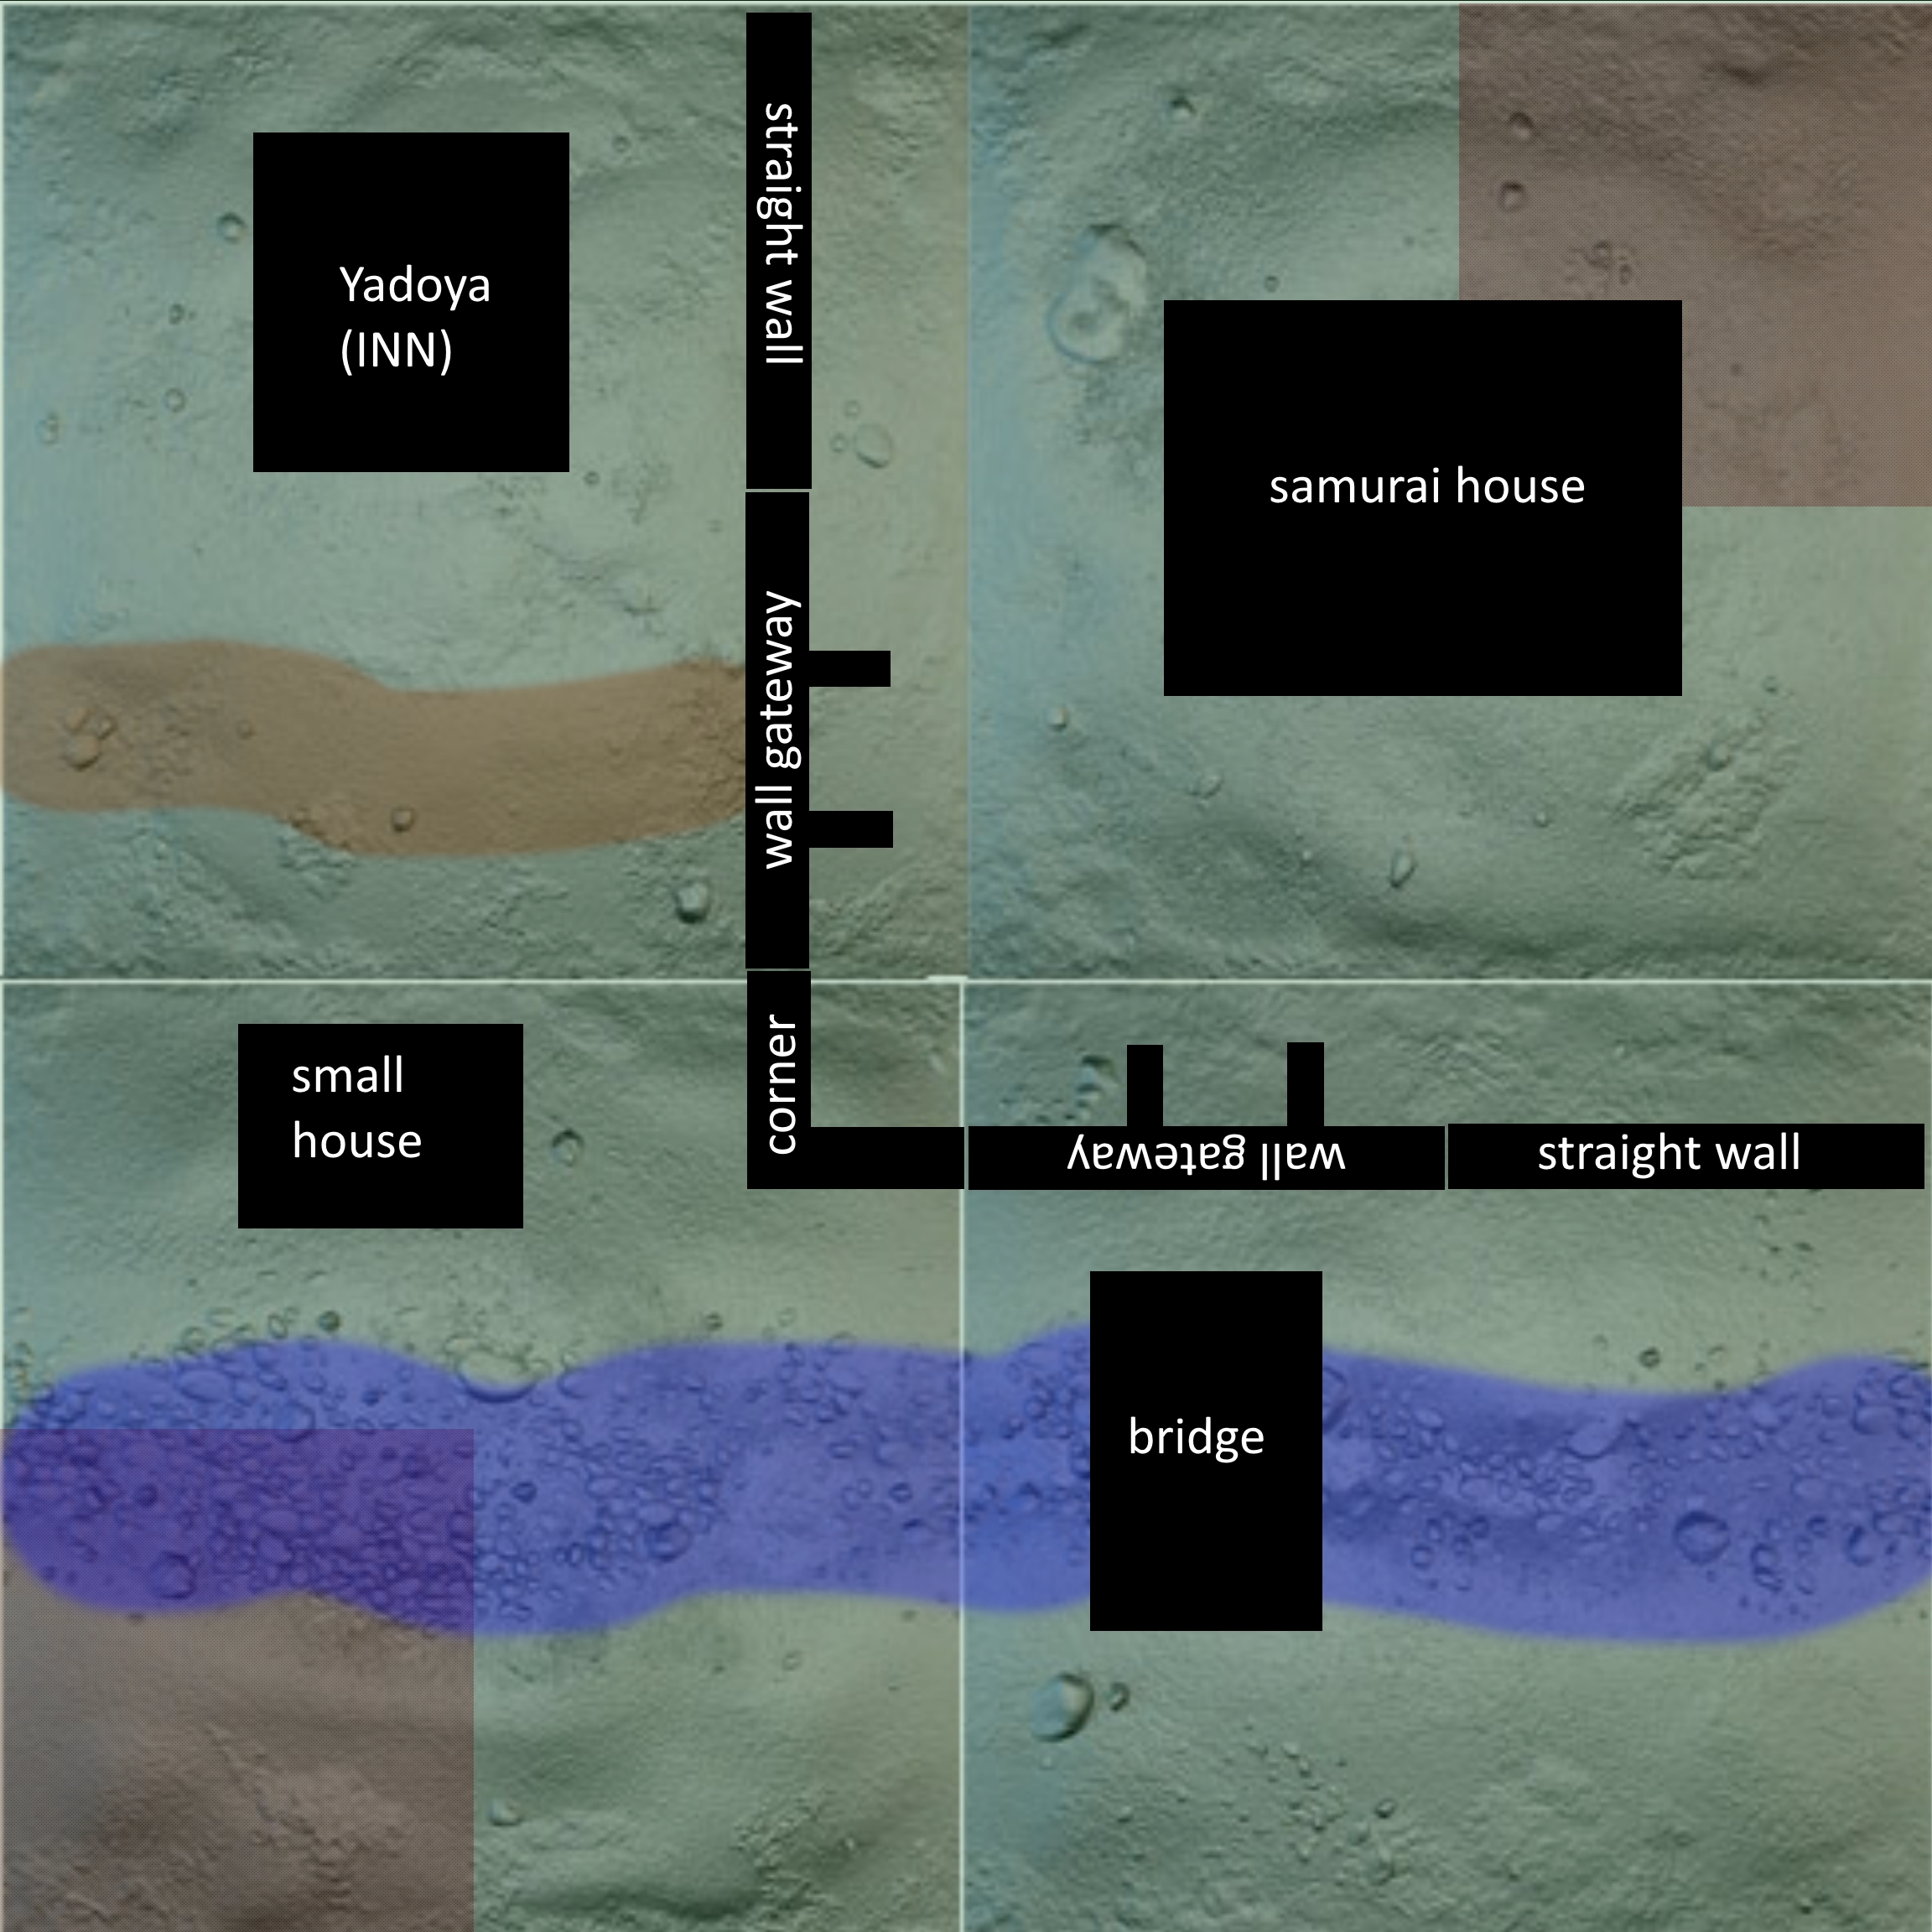
The two roughly equivalent gates make for interesting movement through the space. The river can be a serious spoiler to these missions, by putting the player behind the river far behind if the river impedes movement. It’s a serious enough problem for that side that I think the river winds up needing to just be decorative, rather than an explicit terrain element. Alternately, it may need PLENTY of crossing points or it just becomes super punitive.
With that in mind, though, I do really like the square-walled board for both of those scenarios. The long-walled layout isn’t bad, but it’s less interesting, because you’re just going to get into a big fight in the center, and unless you have special movement abilities, you’re going to get stuck in and around the one gate that both players have to use.
Let’s look at the other scenario layouts.
Mission Type 2: Three Center-Line Objectives
This is a slightly more complex setup, in that it requires some objectives (usually markers of some kind, urns or graves or altars or whatever) to be placed in specific places on the board. It looks like this:

The pictured scenario is called “Seigyo” (制御, “control”). It has three objectives along the center line, two that are six inches from the sides and one twelve inches from both sides, in the center of the board. The scenario goes on for 6 turns, and at the ends of turns 2, 4, and 6 the player controlling the most objectives scores. The objectives start as Neutral and can be shifted one degree per action: Friendly <-> Neutral <-> Enemy. Each shift will move it one degree closer to Friendly.
This scenario leads to fighting along the centerline, at each of the objectives. It’s fairly resource-intensive to shift objectives, so you’re not going to deviate much from that center line except with dedicated flanking units. Most likely the action is going to be focused on the dead center of the board, while the outlying two objectives are held by opposite players.
The other scenario using this layout is called “The Idols”. It is also six turns long and involves taking control of three centerline objectives, and scores at the ends of turns 2, 4, and 6. The difference between this and Seigyo is subtle: Every time a player scores, their opponent chooses one of the objectives controlled by the scoring player to remove. This means that not only are there fewer objectives every other turn (assuming anyone scores), it also means that the player who scored loses their lead.
Rather than take-and-hold, this scenario is much more dynamic and mobile, but it’s still operating along that center line. Most of the play is going to focus around those center three objectives, but unlike Seigyo, it’s probably going to shift rather than focus on the center objective.
Looking at the board layouts I have, the player behind the walls in the square-walled layout has a distinct advantage, with two of the centerline objectives within “their” walls. That having been said, the center objective winds up right between the two gates, which is where fighting naturally occurs anyway. I’d want to ensure that the left-side objective favors the player starting on the river side of the board, either by providing advantageous cover or a blocking building or something.
On the other hand, there’s the long-walls layout:

The small house would have to move in this layout, but it’s mostly okay, though it favors the river-side player who can go straight for all three objectives, while the player behind the walls has to maneuver around the gates. This could theoretically be fixed to some extent by putting the two gates next to one another, but that creates an awkward dead area around the upper left corner. It goes from being a slight advantage for the walls player on the square-walled layout to a HEAVY advantage to the river-side player on the long-walled layout.
Two more scenarios to look at:
Mission Type 3: Six Objectives in a Centered Hexagon
By far the most complex setup for scenarios in Bushido, these scenarios have both a more complex layout with six objectives AND more complex mechanics than “interact with objective” or “move to area”. Here’s what it looks like:
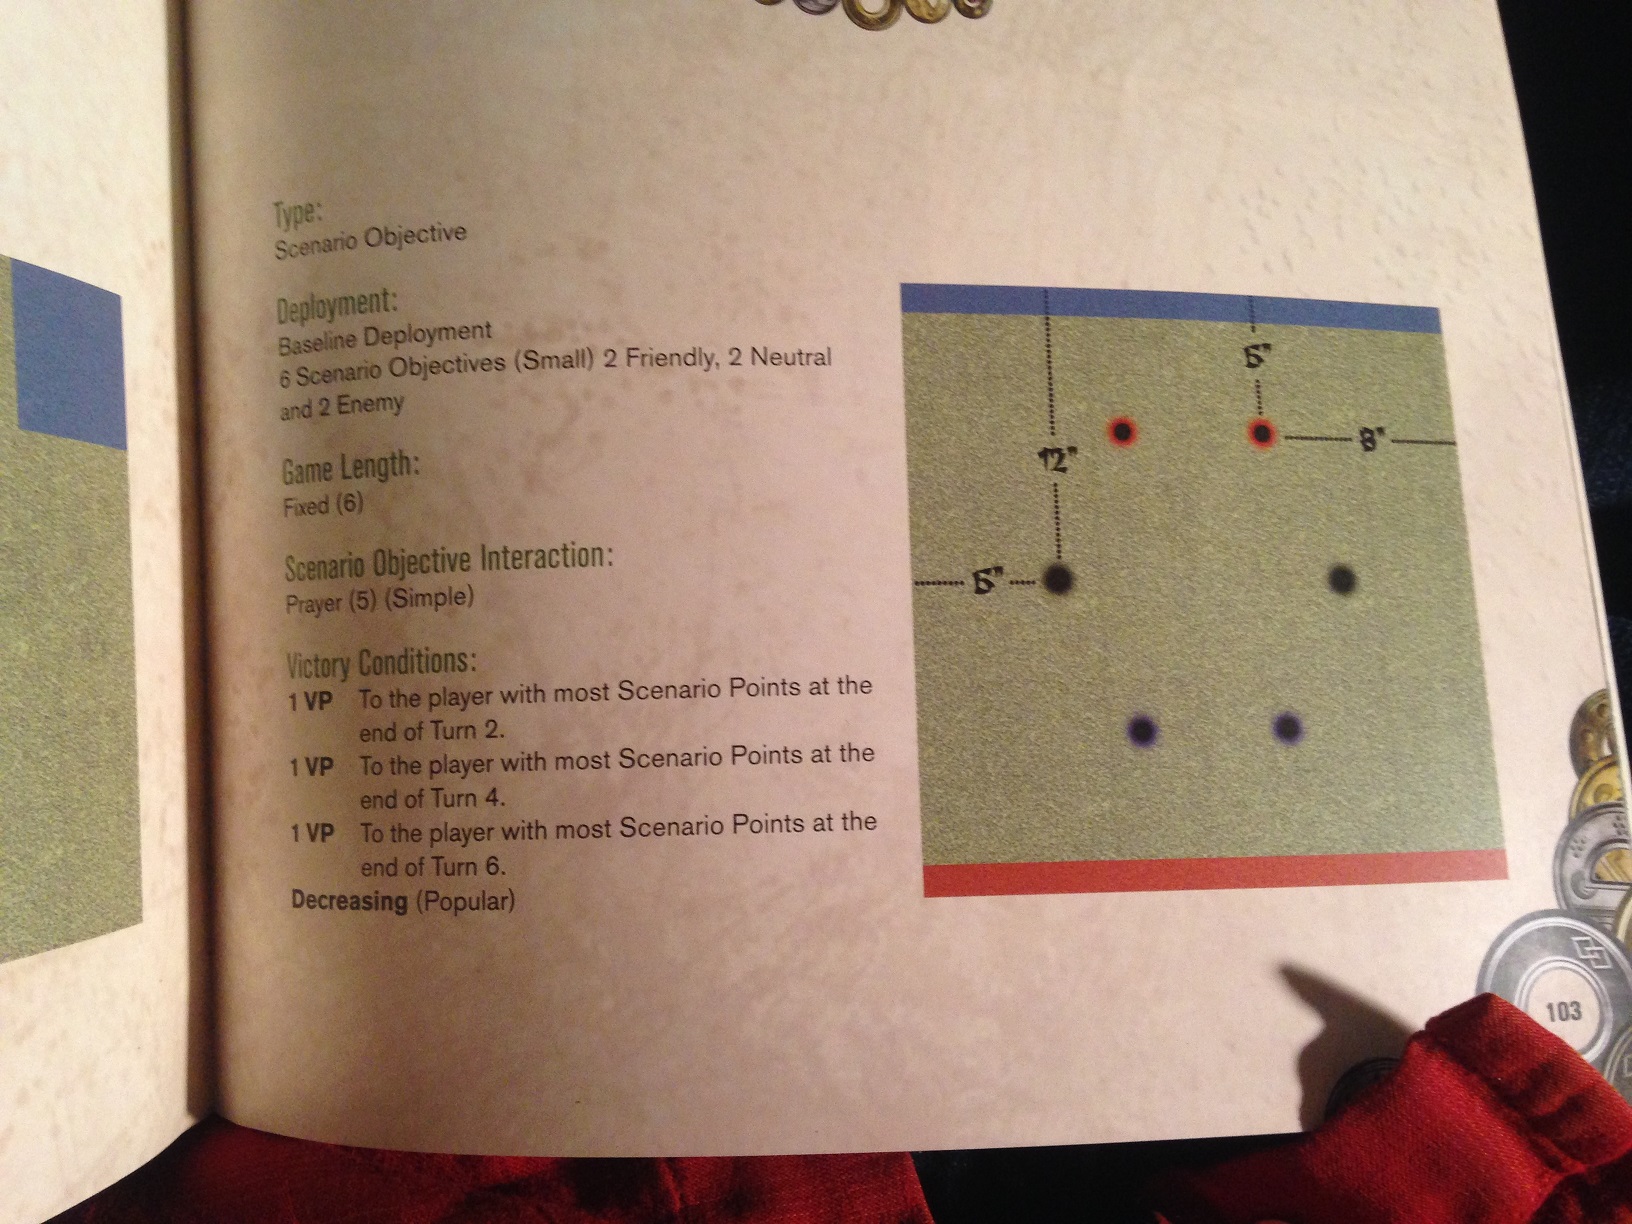
The pictured scenario is “Depletion”, and it’s a bit complex. First, six objectives, placed as shown. The two closest to you are “Friendly”, the two in the middle are “Neutral”, and the two furthest from you are “Enemy”. Scoring is simply “who has the most Scenario Points”, which requires that you understand the “Prayer (5)” interaction.
For a mission with Prayer (X), you get X prayer tokens. A model can take a Prayer action while touching one of the objectives and spends one of the Prayer tokens, and you immediately score a number of points based on the objective– 1 for Friendly, 2 for Neutral, and 3 for Enemy. Basically, you have 5 shots at maximizing your score. As a final twist, whichever the most often used objective was gets removed each time VPs are scored, forcing you to scramble around to find a new objective.
It’s less complicated than it seems once you know what’s up, but this scenario takes you all over the board. You’re probably going to be switching strategies every turn, just based on what happened. Let’s look at the other one.
The other scenario is “Keii” (敬意, or “respect”). It’s functionally the same as “Depletion”, except that instead of an objective vanishing every other turn, on turns 3 and 5 both players’ scores are reset. Whereas Depletion forces you to move around a lot, Keii is more about take-and-hold. Otherwise, it’s the same set of mechanics.
These two are interesting as far as boards go. I REALLY dislike the long-walled layout for these. It puts four objectives where the river-side player can easily reach them (very rough placement, just for visuals):

On top of that, one of the objectives inside the walls is basically right on top of the gate. This board hugely favors the river-side player for these objectives, with the two by the river and the one by the small house being pretty much free grabs, whereas the wall-side player has a nasty uphill battle to reach objectives other than the ones behind their wall and is looking at splitting their force pretty unpleasantly.
Let’s see if the other layout is better:

Okay, that’s interesting. Four objectives outside the wall, two inside the wall. The samurai house location is kind of a problem, note for later. Still, there are interesting deployment options for both players and a roughly even spread of accessible objectives. Importantly, that small house is a problem again, favoring the wall-side player more than the river-side player. Will need to address that, same as the three-centerline-objective layout.
One Final Test
We’ve looked at all of these for one orientation. I already don’t like the alternate orientation of the long-walled layout, but I should look at the alternate orientation of the square-walled layout to see if it works. Red for the centerline objectives, white for the hexagon ones:

The alternate-corners approach is actually much more interesting, going from the bottom left to the upper right. You get some interesting choices of taking the river side or the building side, but neither player really “controls” the walled area.
The three-centerline-objectives layout is about as functional in this orientation as in the other one, which is fine. Some effort would have to be made to make the rightmost objective favor the bottom-side player here, but otherwise it’s pretty reasonable. A note for later, to make sure the overall layout works both ways. The impact shouldn’t be large.
The six-hexagonal-objectives layout is actually rather nice in this layout. Same two-in/four-out setup, though my very rough layouts don’t make that entirely clear (and the picture isn’t perfect anyway), but it offers a very similar experience in both orientations. My inclination is that the two would play roughly evenly, which is great. I almost like this orientation better than the other for this mission, just for the interesting flanking opportunities.
After looking at the scenarios, I am much happier with the square-walled layout. Here’s my list of tweaks to it:
–Small house needs to be moved or replaced to favor the river-side player, has little effect on alternate orientation.
–Right-side objective needs to favor non-walled-side player in alternate orientation.
–Samurai House needs to move to accommodate objective placement.
Pretty small number of changes, all things considered.